Wedding Floral Techniques: Master Bouquets, Centerpieces & Arches to Elevate Your Big Day
Hi there, fellow wedding lovers and aspiring floral enthusiasts! I’m Sarah Bennett, a professional wedding floral designer with over 12 years in the industry—creating dreamy floral moments for couples across California, New York, and even destination weddings in the south of France. If you’ve ever stared at a wedding magazine or scrolled through Pinterest, jaw-dropped by those ethereal bridal bouquets, showstopping centerpieces, and magical floral arches, you’re not alone. I’ve been there too—starting as a hobbyist with a passion for flowers, turning that passion into a six-figure career, and now I’m here to pull back the curtain on the wedding floral techniques that make those moments possible.
Wedding floral design isn’t just about picking pretty flowers and sticking them together—it’s an art, a science, and a labor of love. Whether you’re a bride-to-be wanting to DIY your own bridal bouquet (yes, it’s totally doable!), a wedding planner looking to expand your floral skills, or someone who’s always dreamed of turning their love for blooms into a profitable business, this guide is for you. We’re diving deep into the three pillars of wedding floral design: bridal bouquets, centerpieces, and floral arches. I’ll share my tried-and-true techniques, insider tips, common mistakes to avoid, and even the latest 2025-2026 trends that are taking the wedding world by storm. By the end of this article, you’ll have the knowledge and confidence to create stunning, long-lasting floral pieces that will make your wedding (or your client’s wedding) unforgettable.
Let’s start with the heart of wedding florals: the bridal bouquet. It’s the first thing guests notice when the bride walks down the aisle, the accessory that ties her entire look together, and a keepsake she’ll cherish for years to come. I’ve designed thousands of bouquets—from minimalist single-stem arrangements to lush, overflowing garden-style bundles—and I’ve learned that the best bouquets aren’t just beautiful; they’re intentional. Every stem, every color, every texture is chosen with purpose, and the technique behind putting them together is what makes them stand out.
Bridal Bouquet Tutorial: Crafting a Timeless, Durable Bouquet (Even if You’re a Beginner)
First, let’s debunk a myth: you don’t need to be a professional to create a stunning bridal bouquet. I’ve taught brides, bridesmaids, and even grandmothers how to DIY their own bouquets, and the key is to follow a simple, step-by-step process. Let’s break it down, from choosing the right flowers to mastering the spiral technique (the secret to a bouquet that stays together all day long).
Step 1: Choose Your Flowers (Pro Tip: Prioritize Seasonality & Longevity)
The first rule of wedding floral design—for bouquets, centerpieces, or arches—is to work with seasonal flowers. Not only are they more affordable (hello, budget-friendly wins!), but they’re also fresher, sturdier, and more in line with the natural beauty of your wedding season. For example, if you’re having a spring wedding, opt for peonies, ranunculus, tulips, or sweet peas—they’re lush, colorful, and perfect for a romantic vibe. For a summer wedding, go for dahlias, sunflowers, zinnias, or garden roses—they’re bold, vibrant, and hold up well in the heat. Fall weddings shine with chrysanthemums, dahlias, asters, and eucalyptus, while winter weddings call for amaryllis, ranunculus, holly, and evergreens.
But seasonality isn’t the only factor—you also need to choose flowers that are durable. The last thing you want is a bouquet that wilts halfway through your ceremony or photos. My go-to durable blooms for bridal bouquets include garden roses (they’re hearty and have a romantic ruffled texture), peonies (when in season, they’re surprisingly sturdy), ranunculus (long-lasting and come in a range of soft hues), and succulents (perfect for adding texture and they don’t wilt at all!). Avoid delicate flowers like lilacs or hydrangeas if you’re DIY-ing—they’re beautiful, but they require more care and can wilt quickly if not handled properly.
Pro Insider Tip: Mix “focal flowers” (the star blooms, like garden roses or peonies) with “filler flowers” (smaller blooms that add volume, like baby’s breath, wax flowers, or astilbe) and “greenery” (to add texture and flow, like eucalyptus, ruscus, or fern). The ratio I swear by is 60% focal flowers, 30% filler, and 10% greenery—this creates a balanced, lush look without being overwhelming.
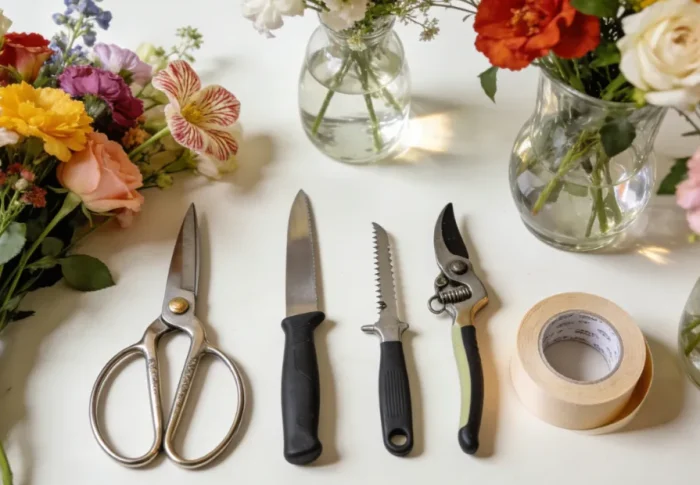
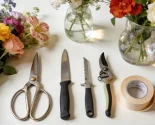
Step 2: Gather Your Supplies (Don’t Skip These!)
Before you start arranging, make sure you have all the tools you need. Here’s my essential list for a DIY bridal bouquet:
- Fresh, seasonal flowers (I recommend buying 10-15 focal flowers, 8-10 filler flowers, and a handful of greenery—adjust based on the size of the bouquet you want)
- Floral shears (sharp ones—dull shears crush the stems, which prevents water absorption)
- Floral tape (green, waterproof tape works best—avoid clear tape, which is less secure)
- Ribbon (satin, lace, or linen—choose a color that complements your wedding palette; I love using 2-3 inch wide ribbon for a luxurious look)
- Waterproof floral foam (optional, but great for keeping the bouquet fresh if you’re making it a day ahead)
- A vase of water (to keep stems fresh while you arrange)
- Paper towels (for cleaning stems and wiping up any water)
Pro Insider Tip: If you’re making your bouquet the day before your wedding, store it in the refrigerator (not the freezer!) wrapped in a damp paper towel and plastic wrap. This will keep the flowers fresh and perky for your big day. Just make sure to take it out 30-60 minutes before the ceremony so it can come to room temperature—cold flowers can look wilted until they warm up.
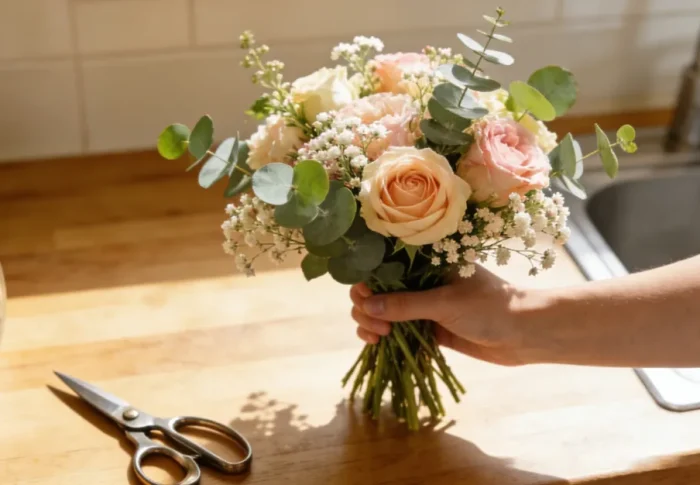
Step 3: Master the Spiral Technique (The Key to a Professional-Looking Bouquet)
The spiral technique is the foundation of every great bridal bouquet. It’s a method of arranging flowers so that each stem spirals around a central axis, creating a rounded, balanced shape that stays together without falling apart. I know it sounds intimidating, but once you get the hang of it, it’s second nature. Here’s how to do it:
- Start with your greenery. Take one stem of eucalyptus (or your greenery of choice) and hold it in your non-dominant hand (this will be your “base” hand).
- Take your first focal flower (e.g., a garden rose) and place it at a 45-degree angle to the greenery, slightly to the right. Rotate your hand (not the flower) clockwise so that the stem spirals around the greenery.
- Add another focal flower, this time slightly to the left, again at a 45-degree angle, and rotate your hand clockwise. Continue adding focal flowers, alternating sides, and rotating each time—this creates the spiral shape.
- Once all your focal flowers are added, start adding filler flowers. Tuck them in between the focal flowers, following the same spiral pattern. Make sure to vary the height—some filler flowers should be slightly taller than the focal flowers, others slightly shorter—to create dimension.
- Add your remaining greenery to fill in any gaps and add flow. I like to let some greenery hang down slightly for a natural, garden-style look.
- Once you’re happy with the shape, hold the bouquet tightly just below the flower heads and trim the stems at a 45-degree angle (this helps the stems absorb water).
- Wrap floral tape around the stems, starting just below the flower heads and working your way down to the end. Pull the tape tightly as you wrap—this will secure all the stems together.
- Finish by wrapping the ribbon around the stems, covering the floral tape. Tie a bow at the bottom, or leave the ribbon loose for a more relaxed look. You can also add a few pearl pins or crystals to the ribbon for extra sparkle.
Common Mistake to Avoid: Don’t arrange flowers in a straight line—this creates a flat, unflattering bouquet. The spiral technique ensures that the bouquet is rounded and has depth, which looks beautiful in photos and in person. Also, don’t overcrowd the bouquet—leave some space between stems so the flowers can breathe and the shape doesn’t look messy.
Pro Insider Tip: Practice, practice, practice! I recommend doing a “test bouquet” a week before your wedding with cheaper flowers (like carnations or daisies) to get comfortable with the spiral technique. This will help you avoid mistakes on the big day and give you confidence in your skills.
2025-2026 Bridal Bouquet Trends You’ll Love
As a professional, I’m always keeping an eye on the latest wedding floral trends, and 2025-2026 is all about individuality and natural beauty. Here are the trends I’m seeing everywhere—and how you can incorporate them into your bouquet:
- Natural Garden Style: Think loose, unstructured bouquets with a “just picked from the garden” vibe. Mix different textures and heights, and let some stems hang down for a relaxed, romantic look. This style is perfect for outdoor, boho, or rustic weddings.
- Single-Stem Bouquets: Minimalist brides, this one’s for you! A single stem of a large, lush flower (like a peony, garden rose, or calla lily) makes a bold, elegant statement. Add a simple ribbon, and you’re good to go.
- Fruit & Floral Mix: A fun, unexpected trend—incorporate small fruits like berries, grapes, or even small apples into your bouquet for a pop of color and texture. This works especially well for fall or summer weddings.
- Dried Flower Accents: Dried flowers are making a comeback, and they’re perfect for adding texture and longevity to your bouquet. Mix dried lavender, baby’s breath, or pampas grass with fresh flowers for a boho, timeless look.
- Monochromatic Bouquets: One color, multiple shades—this trend is sleek, sophisticated, and perfect for modern weddings. For example, a bouquet of white garden roses, white ranunculus, and white eucalyptus, or a bouquet of blush pink peonies and blush spray roses.
Wedding Centerpieces: Transform Your Reception Tables with These Techniques
Next up: centerpieces. These are the unsung heroes of wedding decor—they set the tone for your reception, create a cohesive look, and give guests something beautiful to admire during dinner. I’ve designed centerpieces for every style of wedding, from intimate backyard gatherings to grand ballroom receptions, and the key is to balance beauty with functionality. You want a centerpiece that’s stunning, but not so tall that guests can’t talk to each other across the table.
The best part about centerpieces is that they’re incredibly versatile. You can keep them simple and elegant, or go bold and dramatic—whatever fits your wedding style and budget. Let’s break down the techniques you need to create centerpieces that wow, plus my favorite trends and tips for making them stand out.
First: Choose the Right Vessel (It Matters More Than You Think)
The vessel you choose for your centerpiece sets the foundation for the entire arrangement. Here are my go-to vessels for different wedding styles:
- Rustic Weddings: Mason jars, wooden boxes, or terracotta pots (painted or natural) work perfectly. They add a cozy, country vibe and pair well with wildflowers, eucalyptus, and dried greenery.
- Modern Weddings: Sleek glass vases (cylinder, cube, or trumpet-shaped), metallic containers (gold, silver, or rose gold), or geometric planters. These are perfect for minimalist arrangements with clean lines.
- Romantic Weddings: Vintage vases (crystal, porcelain, or ceramic), mercury glass, or lace-wrapped containers. These add a touch of elegance and pair well with garden roses, peonies, and soft greenery.
- Boho Weddings: Macramé hangers (for hanging centerpieces), woven baskets, or hand-painted pots. These are perfect for lush, unstructured arrangements with lots of texture.
Pro Insider Tip: Consider the height of your vessel. For round tables, I recommend vessels that are 8-12 inches tall—this keeps the centerpiece low enough for guests to converse, but tall enough to make an impact. For long tables, you can mix heights (some short, some tall) to create visual interest, but make sure the tallest centerpieces are no taller than 18 inches.
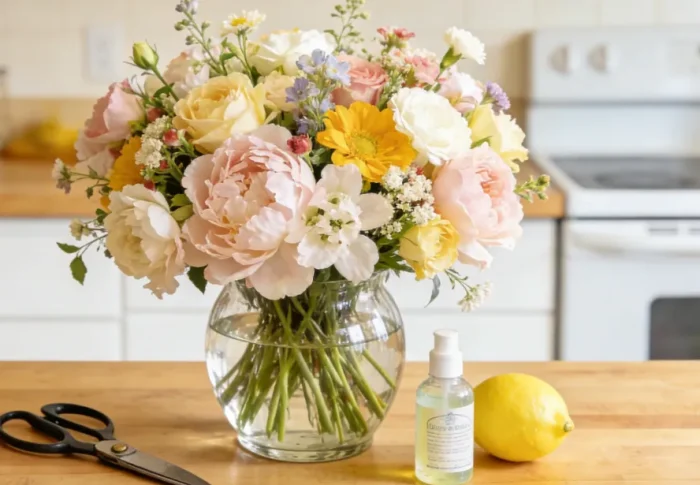
Step-by-Step: Create a Classic Centerpiece (Perfect for Beginners)
Let’s walk through creating a classic, versatile centerpiece that works for any wedding style. This arrangement uses seasonal flowers, greenery, and a simple glass vase—you can customize it with your favorite blooms and colors.
- Prepare your vessel: Clean the vase thoroughly and fill it with room-temperature water. Add a packet of flower food (this helps keep the flowers fresh longer—don’t skip this!).
- Add greenery: Start by adding greenery to the vase—this creates a “base” for your flowers and adds texture. I like to use eucalyptus or ruscus, as they’re easy to work with and add a soft, natural look. Cut the greenery stems at a 45-degree angle and place them in the vase, spreading them out to create a rounded shape.
- Add focal flowers: Next, add your focal flowers (e.g., garden roses, peonies, or dahlias). Cut the stems to the desired length (they should be slightly taller than the greenery) and place them in the vase, spacing them out evenly. Make sure the focal flowers are the star of the arrangement—don’t overcrowd them with filler.
- Add filler flowers: Tuck filler flowers (e.g., baby’s breath, wax flowers, or astilbe) in between the focal flowers to add volume and fill in any gaps. Cut the filler stems slightly shorter than the focal flowers so they don’t overpower the main blooms.
- Adjust and perfect: Step back and look at your arrangement—make sure it’s balanced and has a rounded shape. If any stems are sticking out too far, trim them. If there are gaps, add more filler or greenery.
- Finish with details: Add a ribbon around the vase, or place a few small candles around the centerpiece for a romantic glow. For a personal touch, you can add small photos of the couple or name cards for each guest.
Common Mistake to Avoid: Overcrowding the vase. Too many flowers can make the centerpiece look messy and overwhelming. Remember, less is more—leave some space between stems so the flowers can shine. Also, don’t use flowers that are too tall—guests need to be able to see each other across the table!
Budget-Friendly Centerpiece Hacks (Without Sacrificing Style)
I know weddings can be expensive, and florals are often one of the biggest expenses. But you don’t have to spend a fortune to create beautiful centerpieces. Here are my top budget-friendly hacks:
- Use more greenery than flowers: Greenery is cheaper than focal flowers, and it adds texture and volume. For example, a centerpiece made of eucalyptus, ruscus, and a few small filler flowers is just as beautiful as one with lots of expensive blooms.
- DIY with seasonal flowers: As I mentioned earlier, seasonal flowers are more affordable. Visit your local farmers’ market or flower shop to find cheap, fresh blooms.
- Reuse ceremony florals: Repurpose your bridal bouquet, bridesmaid bouquets, or ceremony arch flowers as centerpieces. This saves money and ensures your florals are used throughout the day.
- Use non-floral elements: Mix flowers with candles, fruits, or even books to create a unique centerpiece. For example, a centerpiece with a few roses, a candle, and a stack of vintage books is cozy, romantic, and budget-friendly.
- Opt for small arrangements: Instead of one large centerpiece per table, use 2-3 small arrangements. This is cheaper and adds visual interest.
2025-2026 Centerpiece Trends to Inspire You
Centerpieces are getting more creative than ever, and 2025-2026 is all about personalization and sustainability. Here are the trends I’m loving right now:
- Sustainable Centerpieces: Couples are increasingly choosing eco-friendly options, like potted plants (which guests can take home as favors), dried flowers, or locally sourced blooms. This is not only better for the environment but also adds a unique touch.
- Low, Lush Arrangements: Low centerpieces are making a comeback—they’re functional (guests can talk!) and elegant. Think lush, rounded arrangements that sit low on the table, with lots of greenery and filler flowers.
- Mix of Textures: Combining different textures—like soft flowers, rough greenery, and metallic accents—creates a visually interesting centerpiece. For example, a centerpiece with garden roses, eucalyptus, succulents, and gold candleholders.
- Themed Centerpieces: Centerpieces that tie into your wedding theme—whether it’s a beach wedding (with seashells and tropical flowers) or a winter wedding (with evergreens and holly)—add a cohesive, personal touch.
- Hanging Centerpieces: Perfect for long tables or outdoor receptions, hanging centerpieces (like macramé hangers with flowers or glass jars filled with blooms) add height and drama without taking up table space.
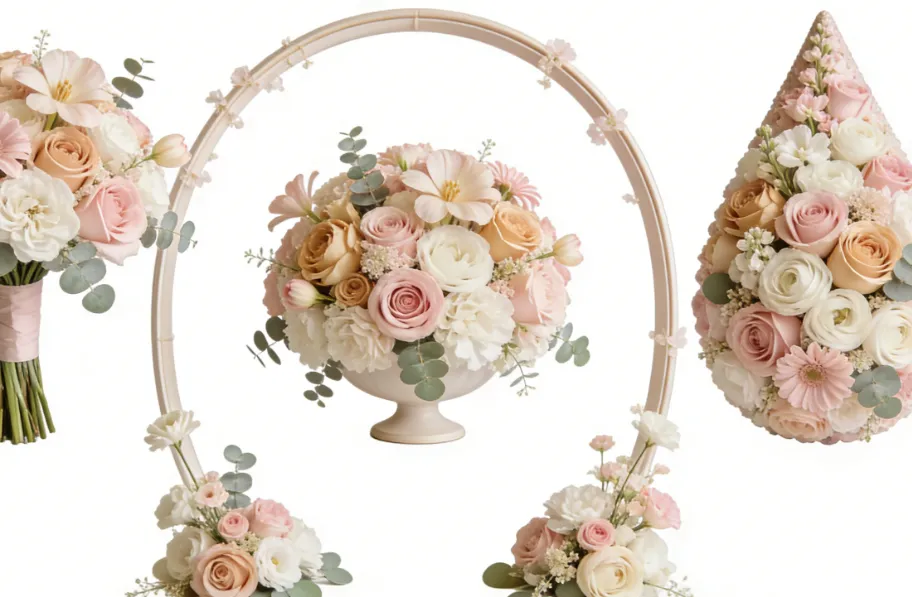
Floral Arches: Create a Showstopping Ceremony Backdrop
Last but certainly not least: floral arches. A floral arch is the ultimate wedding statement piece—it’s the backdrop for your ceremony, the spot where you exchange vows, and the perfect photo opportunity. I’ve designed floral arches for every style of wedding, from intimate backyard ceremonies to grand ballroom events, and they never fail to take guests’ breath away.
The best part about floral arches is that they’re incredibly customizable. You can cover the entire arch in flowers for a dramatic look, or add a few strategic blooms for a more subtle, elegant vibe. You can use fresh flowers, dried flowers, greenery, or even a mix—whatever fits your style and budget. Let’s dive into the techniques you need to create a stunning floral arch, plus my insider tips for making it last all day.
Step 1: Choose Your Arch Style (Match It to Your Wedding)
First, you need to choose the right arch style for your wedding. Here are the most popular styles, and how to choose the right one:
- Round Arch: The classic choice—perfect for romantic, traditional weddings. Round arches are soft and elegant, and they work well with lush, garden-style flowers.
- Square Arch: A modern, sleek choice—great for contemporary or minimalist weddings. Square arches are bold and structured, and they pair well with clean, simple flower arrangements.
- Ceremony Arch with a Backdrop: Add a fabric backdrop (like tulle, linen, or silk) to your arch for extra romance. This works well for outdoor weddings, as it adds a soft, dreamy look.
- Tree Stump or Branch Arch: A rustic, boho choice—perfect for outdoor, backyard, or forest weddings. Use natural branches or tree stumps to create the arch, then add flowers and greenery for a wild, natural look.
- Combination Arch: For a dramatic, statement-making look, go for a combination arch—like a round arch with a square base, or a multi-arch setup (side-by-side arches for a grand entrance).
Pro Insider Tip: Consider the size of your venue. If you’re having a small, intimate ceremony, a small round arch is perfect. If you’re having a large wedding in a ballroom or outdoor space, a larger arch (or multiple arches) will make a bigger impact. Also, make sure the arch is tall enough—you want it to be at least 7-8 feet tall so you and your partner fit comfortably underneath.
Step 2: Gather Your Supplies (Essentials for a Sturdy Arch)
Creating a floral arch requires a few more supplies than a bouquet or centerpiece, but it’s still manageable—even for beginners. Here’s what you’ll need:
- Arch frame (metal, wood, or PVC—metal is the sturdiest, but wood is more rustic)
- Floral foam (soaked in water—this helps keep the flowers fresh)
- Floral wire (to attach flowers and greenery to the arch)
- Floral tape (to secure stems)
- Fresh flowers (focal flowers, filler flowers, and greenery—you’ll need more than you think! For a full arch, plan on 50-100 focal flowers, 30-50 filler flowers, and a lot of greenery)
- Ladder (to reach the top of the arch)
- Helper (optional, but highly recommended—setting up an arch is easier with two people)
Pro Insider Tip: If you’re using fresh flowers, soak the floral foam in water for at least 30 minutes before using it—this ensures it’s fully hydrated and will keep the flowers fresh all day. Also, use waterproof floral foam if your arch is outdoors (in case it rains).
Step 3: Assemble Your Floral Arch (Step-by-Step Guide)
Now, let’s put it all together. This step-by-step guide will help you create a stunning floral arch that’s sturdy, beautiful, and long-lasting.
- Set up the arch frame: Place the arch frame in the desired location (make sure it’s level and sturdy—if it’s outdoors, you may need to weigh it down with sandbags or stakes to prevent it from falling over).
- Attach the floral foam: Cut the floral foam into pieces that fit the arch frame. Use floral wire to attach the foam to the frame—make sure it’s secure, as it will hold the weight of the flowers.
- Add greenery: Start by adding greenery to the foam—this creates a base and covers the foam so it’s not visible. Use eucalyptus, ruscus, or fern, and attach them to the foam with floral wire. Start at the bottom of the arch and work your way up, spreading the greenery out to create a full, natural look.
- Add focal flowers: Next, add your focal flowers (e.g., garden roses, peonies, or dahlias). Cut the stems to the desired length (they should be long enough to insert into the foam, but not too long that they stick out too far). Insert the stems into the foam, spacing them out evenly. Focus on the top and sides of the arch—these are the most visible areas.
- Add filler flowers: Tuck filler flowers into the foam to fill in any gaps and add volume. Cut the stems slightly shorter than the focal flowers so they don’t overpower the main blooms.
- Adjust and perfect: Step back and look at the arch—make sure it’s balanced and has a cohesive look. If any flowers are sticking out too far, trim them. If there are gaps, add more greenery or filler flowers.
- Secure any loose stems: Use floral wire to secure any loose stems or flowers to the arch frame—this ensures they don’t fall off during the ceremony.
Common Mistake to Avoid: Overloading the arch with flowers. Too many flowers can make the arch look heavy and messy, and it can also cause the foam to break or the arch to tip over. Remember, balance is key—leave some space between flowers to let the arch breathe. Also, don’t forget to water the foam periodically (especially if it’s outdoors) to keep the flowers fresh.
Pro Tips for a Long-Lasting Floral Arch
There’s nothing worse than a floral arch that wilts halfway through your ceremony. Here are my top tips for keeping your arch looking fresh all day:
- Choose durable flowers: As with bouquets, choose flowers that are sturdy and long-lasting. Avoid delicate flowers like lilacs or hydrangeas, which wilt quickly.
- Soak the floral foam thoroughly: Make sure the foam is fully hydrated before adding flowers—this will keep the flowers fresh for hours.
- Keep the arch out of direct sunlight: If your ceremony is outdoors, place the arch in a shaded area to prevent the flowers from wilting in the heat.
- Mist the flowers periodically: Use a spray bottle to mist the flowers with water every hour or so—this helps keep them hydrated.
- Set up the arch as close to the ceremony as possible: Don’t set up the arch the night before—do it the morning of the wedding to ensure the flowers are fresh.
2025-2026 Floral Arch Trends That Are Stealing the Show
Floral arches are getting more creative every year, and 2025-2026 is all about bold, personalized designs. Here are the trends I’m most excited about:
- Full Floral Arches: Covering the entire arch in flowers for a dramatic, fairy-tale look. This is perfect for grand weddings and looks stunning in photos.
- Asymmetrical Arches: Instead of a balanced, symmetrical arch, go for an asymmetrical design—with more flowers on one side than the other. This adds a modern, edgy touch.
- Dried Flower Arches: Dried flowers are sustainable, long-lasting, and perfect for boho or rustic weddings. Mix dried lavender, pampas grass, and dried roses for a timeless look.
- Floral Arches with Lights: Add fairy lights or string lights to your arch for a romantic, magical glow—perfect for evening ceremonies or receptions.
- Minimalist Arches: Less is more—add a few strategic flowers and greenery to the arch for a subtle, elegant look. This is perfect for minimalist or modern weddings.
Final Thoughts: Turning Your Floral Dreams Into Reality
Wedding floral design is all about passion, creativity, and attention to detail. Whether you’re DIY-ing your own bouquets, centerpieces, and arch, or working with a professional, the techniques I’ve shared here will help you create stunning, memorable floral pieces that elevate your big day.
Remember, there’s no “right” way to design wedding florals—what matters most is that they reflect your personality and style. Don’t be afraid to experiment with different flowers, colors, and textures, and don’t stress if things don’t turn out perfectly on the first try. Practice makes perfect, and even small mistakes can lead to beautiful, unique designs.
If you’re thinking about turning your love for wedding florals into a career, let me tell you—it’s one of the most rewarding jobs I’ve ever had. I started with a small home studio, offering DIY tutorials and small wedding floral packages, and now I’m booking weddings months in advance and teaching other aspiring floral designers the skills they need to succeed. The key is to be patient, stay curious, and always keep learning—trends change, but the love for flowers never does.
I hope this guide has inspired you to create the wedding florals of your dreams. Whether you’re a bride-to-be, a wedding planner, or a floral enthusiast, remember: every flower has a story, and every arrangement is a work of art. Now go grab your shears, pick some beautiful blooms, and let your creativity shine!