How to Make a Professional Flower Bouquet at Home: A Step-by-Step Guide for Stunning, Budget-Friendly Blooms
Hi there, fellow flower lover! If you’ve ever walked past a high-end florist shop, stared at those lush, perfectly arranged bouquets, and thought, “I wish I could make something that beautiful at home”—you’re not alone. I used to be that person too: intimidated by the “professional” label, convinced that creating a bouquet that looked polished and intentional required years of training, fancy tools, or a bottomless budget. But here’s the truth I’ve learned after years of experimenting (and yes, a few failed attempts): anyone can make a professional-quality flower bouquet at home. You don’t need to be a florist, you don’t need expensive supplies, and you definitely don’t need to stress about being “perfect.”
Today, I’m pulling back the curtain on my go-to method for crafting DIY flower bouquets that look like they came straight from a boutique—without the boutique price tag. Whether you’re making a bouquet for your coffee table, a gift for a friend, a centerpiece for a dinner party, or even a bridal bouquet for your big day, this step-by-step guide will walk you through everything you need to know. We’ll cover how to pick the right flowers (even on a budget), prep them like a pro, arrange them for maximum visual impact, and keep them fresh for days. Plus, I’m sharing all my secret tips—those little tricks that florists use to make their arrangements look effortless and elegant.
Let’s be real: There’s something magical about creating something with your own hands. A DIY flower bouquet isn’t just a bunch of flowers—it’s a labor of love, a way to add a personal touch to your home, and a skill that will impress everyone who sees it. And the best part? It’s easier than you think. So grab your favorite mug (or a vase, if you’re feeling fancy), roll up your sleeves, and let’s dive in. By the end of this tutorial, you’ll be wondering why you ever paid for a pre-made bouquet again.
First: Why DIY? The Benefits of Making Your Own Flower Bouquet
Before we get into the step-by-step, let’s talk about why making your own bouquet is worth the effort. I know, it’s tempting to run to the grocery store, grab a pre-made bunch, and call it a day. But trust me—DIY has so many perks:
- It’s Budget-Friendly: High-end florist bouquets can cost $50-$100 or more, but you can make a similar-looking bouquet at home for $20-$30. Grocery stores, farmers’ markets, and even online flower delivery services (like Farmgirl Flowers or Bouqs) offer affordable, fresh blooms that are perfect for DIY.
- It’s Personal: When you make a bouquet yourself, you get to choose every flower, every color, and every detail. Want to incorporate your mom’s favorite flower? Or match the bouquet to your living room decor? You’re in control. This makes DIY bouquets perfect for gifts—they feel more thoughtful and unique than anything you can buy.
- It’s Therapeutic: There’s something calming about working with fresh flowers—trimming stems, arranging blooms, and breathing in their scent. It’s a great way to unwind after a long day, practice mindfulness, or just take a break from screens.
- It’s Impressive: When you tell someone you made a bouquet yourself, their reaction is always priceless. People assume that professional-looking arrangements are “too hard” to make at home, so your DIY creation will stand out and make you feel proud.
I’ve made DIY bouquets for birthdays, baby showers, date nights, and even my sister’s wedding (she loved it so much, she skipped the florist entirely!). And every time, I’m reminded of how empowering it is to create something beautiful with my own two hands. So let’s stop overcomplicating it—you’ve got this.
What You’ll Need (No Fancy Tools Required!)
One of the biggest myths about making professional bouquets is that you need expensive tools. But the truth is, you probably already have most of what you need at home. Here’s a breakdown of the essentials (and a few optional extras to take your bouquet to the next level):
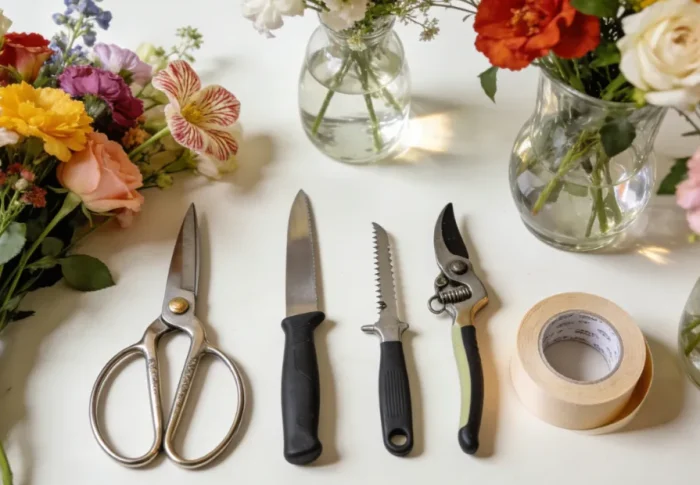
Essential Supplies
- Fresh Flowers: This is the star of the show! We’ll talk more about choosing the right flowers in the next section, but aim for a mix of focal flowers (the main, eye-catching blooms), filler flowers (smaller blooms that add volume), and greenery (to add texture and depth). You’ll need 10-15 stems total for a medium-sized bouquet (perfect for a vase or gift).
- Sharp Scissors or Floral Shears: Dull scissors will crush the stems, which prevents the flowers from drinking water and shortens their lifespan. A pair of sharp kitchen scissors works fine, but if you want to invest in something better, floral shears are cheap and worth it (you can find them at craft stores for $10-$15).
- A Vase or Container: You don’t need a fancy vase—any clean container will work. A mason jar, a vintage teacup, a glass mug, or even a tin can (painted or wrapped in ribbon) adds charm. Just make sure it’s tall enough to support the stems (about ⅔ the height of the bouquet).
- Water: Room temperature water is best—cold water can shock the flowers, and hot water can damage the stems.
- Floral Tape (Optional but Helpful): Floral tape is a thin, stretchy tape that helps hold the stems together. It’s especially useful if you’re making a hand-tied bouquet (we’ll cover that later), but it’s not mandatory. You can also use twine or ribbon if you prefer a more rustic look.
- Ribbon or Twine (Optional): For a finishing touch, wrap the stems in ribbon or twine. This adds a polished look and hides the floral tape or stems. Satin ribbon is perfect for a romantic bouquet, while burlap twine works great for a rustic vibe.
Optional Extras (For That Professional Touch)
- Floral Foam: If you’re making a more structured arrangement (like a centerpiece), floral foam (also called oasis) helps hold the stems in place. It’s available at craft stores and is easy to use—just soak it in water until it’s fully saturated, then place it in your container.
- Flower Food: Most grocery stores and florists give out small packets of flower food for free. It contains nutrients that keep flowers fresh longer. If you don’t have flower food, you can make your own: mix 1 teaspoon of sugar, 1 teaspoon of bleach, and 2 cups of room temperature water. The sugar feeds the flowers, and the bleach prevents bacteria growth.
- Pruning Shears: For thicker stems (like roses or peonies), pruning shears make it easier to make clean cuts. But again, sharp kitchen scissors work in a pinch.
That’s it! No fancy equipment, no expensive supplies—just the basics. Now, let’s talk about choosing the right flowers, because that’s where the magic starts.
Step 1: Choose the Right Flowers (The Secret to a Professional Look)
The key to a professional-looking bouquet is balance: balance of color, size, and texture. You don’t want all large flowers (they’ll look bulky) or all small flowers (they’ll look sparse). Instead, aim for a mix of three types of flowers:
1. Focal Flowers (The “Stars” of the Bouquet)
Focal flowers are the largest, most eye-catching blooms in your bouquet. They’re the first thing people will notice, so choose flowers that you love and that fit the occasion. Here are some of my favorite focal flowers (easy to find and perfect for DIY):
- Roses: Timeless and versatile, roses come in every color imaginable. They’re perfect for romantic bouquets, but they also work for casual arrangements. Look for roses with tight buds (they’ll open up beautifully over a few days) and firm stems.
- Peonies: Fluffy, romantic, and absolutely stunning—peonies are my go-to for spring and summer bouquets. They’re a bit more expensive, but they’re worth it for their full, lush blooms. Choose peonies that are just starting to open (avoid fully open ones, as they won’t last as long).
- Tulips: Bright, cheerful, and perfect for spring. Tulips come in a variety of colors and have a simple, elegant shape. They’re affordable and easy to arrange—plus, they continue to grow after you cut them (so your bouquet will change over time, which is fun!).
- Hydrangeas: Large, full blooms that add instant volume. Hydrangeas are great for filling up a bouquet and come in soft pastels and bold colors. They’re perfect for a romantic or cottage-style arrangement.
- Lilies: Bold, fragrant, and dramatic. Lilies have large, trumpet-shaped blooms that add height and elegance to a bouquet. Just be careful with their pollen—if it gets on your clothes, it’s hard to remove (you can trim the anthers with scissors to avoid this).
Pro Tip: Choose 3-5 focal stems (depending on the size of the bouquet). For a medium-sized bouquet, 3 focal stems are perfect—any more, and it will look overcrowded.
2. Filler Flowers (Add Volume and Texture)
Filler flowers are smaller blooms that fill in the gaps between the focal flowers. They add volume, texture, and depth to the bouquet, making it look full and lush. Here are my favorite filler flowers (affordable and easy to find):
- Baby’s Breath: A classic filler flower with tiny white or pink blooms. It adds a soft, romantic touch and is perfect for filling in gaps. It’s also super affordable—you can get a bunch for $5-$10.
- Gypsophila: Similar to baby’s breath but with larger, more delicate blooms. It comes in white, pink, and even blue, and adds a whimsical touch to any bouquet.
- Asters: Small, daisy-like blooms that come in a variety of colors. They add a pop of color and texture and are perfect for summer bouquets.
- Chrysanthemums: Small, round blooms that come in a range of colors (white, yellow, pink, purple). They’re long-lasting and add a cheerful vibe.
- Spray Roses: Smaller roses with multiple blooms on one stem. They’re perfect for adding texture and a pop of color—plus, they’re more affordable than regular roses.
Pro Tip: Choose 5-7 filler stems. You want enough to fill in the gaps, but not so many that they overpower the focal flowers.
3. Greenery (Adds Depth and Contrast)
Greenery is the unsung hero of a professional bouquet. It adds depth, contrast, and a natural, organic look. It also helps frame the flowers and make them stand out. Here are my favorite greenery options (easy to find and versatile):
- Eucalyptus: My absolute favorite! Eucalyptus has soft, silvery leaves that add a modern, elegant touch. It’s also fragrant and long-lasting. There are different types of eucalyptus (like seeded eucalyptus or silver dollar eucalyptus)—all are great for DIY bouquets.
- Ferns: Delicate, lacy leaves that add a soft, romantic touch. Ferns are perfect for a cottage-style or bohemian bouquet.
- Ivy: trailing greenery that adds a whimsical, romantic vibe. It’s perfect for wrapping around the stems or letting it hang down from the bouquet.
- Ruscus: Shiny, dark green leaves that add a lush, elegant touch. It’s great for adding structure to the bouquet.
- Myrtle: Small, delicate leaves that add a soft, romantic touch. It’s perfect for filling in gaps and adding texture.
Pro Tip: Choose 3-5 greenery stems. You want enough to add depth, but not so much that it overshadows the flowers.
Color Palette Tips (For a Cohesive Look)
Choosing the right color palette is key to a professional-looking bouquet. You don’t want a bunch of clashing colors—instead, aim for a cohesive look that feels intentional. Here are my go-to color palette ideas (perfect for any occasion):
- Monochromatic: Choose flowers in the same color family (e.g., all pinks, all whites, all purples). This creates a sleek, elegant look that’s perfect for formal occasions or minimalist homes. For example, a bouquet of white roses, white hydrangeas, and silver eucalyptus is timeless and sophisticated.
- Complementary Colors: Choose colors that are opposite each other on the color wheel (e.g., pink and green, purple and yellow, red and green). This creates a bold, eye-catching look that’s perfect for casual occasions or adding a pop of color to your home. For example, a bouquet of yellow tulips, purple asters, and green ferns is bright and cheerful.
- Analogous Colors: Choose colors that are next to each other on the color wheel (e.g., pink, purple, blue; yellow, orange, red). This creates a soft, cohesive look that’s perfect for romantic or cottage-style bouquets. For example, a bouquet of pink peonies, purple asters, and blue hydrangeas is soft and dreamy.
- Neutral with a Pop: Choose neutral colors (white, cream, beige, green) and add one pop of color. This is a safe, versatile option that works for any occasion. For example, a bouquet of white roses, cream hydrangeas, silver eucalyptus, and a few red spray roses is elegant and eye-catching.
Pro Tip: Don’t overcomplicate the color palette. Stick to 2-3 main colors—any more, and the bouquet will look chaotic. And remember: there are no “rules” when it comes to color. If you love a combination, go for it! The most important thing is that the bouquet makes you happy.
Step 2: Prep Your Flowers (The Key to Long-Lasting Blooms)
Once you’ve chosen your flowers, it’s time to prep them. This step is crucial—proper prep ensures that your flowers stay fresh for days (up to a week!) and makes arranging them much easier. Here’s how to do it:
1. Unwrap and Inspect Your Flowers
First, unwrap your flowers and inspect them. Remove any damaged petals, leaves, or stems (brown leaves, wilted petals, or broken stems). If a flower has a few damaged petals, you can trim them off with scissors—this will make the flower look fresher and prevent the damage from spreading.
2. Trim the Stems
This is the most important step in prepping your flowers. Stems that are cut at an angle can absorb water better than straight cuts, which keeps the flowers fresh longer. Here’s how to trim them:
- Fill a sink or large bowl with room temperature water.
- Hold the stem under the water (this prevents air bubbles from forming in the stem, which blocks water absorption).
- Use sharp scissors or floral shears to cut the stem at a 45-degree angle. Cut 1-2 inches off the bottom of the stem—this removes the part of the stem that was sitting in water (and possibly bacteria) at the store.
- For woody stems (like roses or lilies), make a small slit in the bottom of the stem (about ½ inch) to help them absorb water better.
3. Remove Leaves Below the Water Line
Any leaves that are below the water line in your vase will rot, which causes bacteria growth and shortens the lifespan of your flowers. So, remove all leaves from the lower part of the stems—only leave leaves that are above the water line (these add texture and depth to the bouquet).
4. Place in Water (With Flower Food)
Fill your vase or container with room temperature water and add flower food (or your homemade mixture). Place the trimmed flowers in the water and let them sit for at least 2-4 hours (or overnight, if possible). This is called “hydrating” the flowers—they’ll absorb water and perk up, making them easier to arrange.
Pro Tip: Keep the flowers in a cool, dark place while they hydrate (away from direct sunlight, heat sources, or fruit). Fruit releases ethylene gas, which causes flowers to wilt faster.
Step 3: Arrange Your Bouquet (The Fun Part!)
Now that your flowers are prepped and hydrated, it’s time to arrange them. There are two main ways to arrange a bouquet: in a vase (the easiest method for beginners) or hand-tied (a more professional, portable method). I’ll walk you through both, so you can choose which one works best for you.
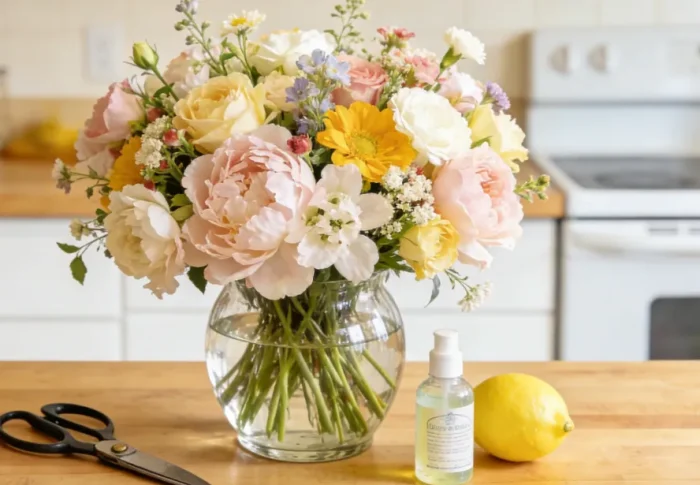
Method 1: Vase Arrangement (Perfect for Beginners)
This is the easiest method—great for beginners or anyone who wants a low-stress arrangement. Here’s how to do it:
1. Prepare Your Vase
Fill your vase with room temperature water and flower food. If you’re using floral foam (for a more structured arrangement), soak it in water until it’s fully saturated, then place it in the vase. The foam should be level with the top of the vase.
2. Start with Greenery
Begin by adding your greenery to the vase. This creates a “base” for your flowers and helps frame the arrangement. Insert the greenery stems at different angles—some tall, some short—to create depth. You want the greenery to extend slightly beyond the flowers, so it frames them nicely.
Pro Tip: Don’t be afraid to trim the greenery to different lengths—this adds a natural, organic look. For example, eucalyptus stems can be longer to add height, while ferns can be shorter to fill in gaps.
3. Add Focal Flowers
Next, add your focal flowers. These are the stars, so place them in the center of the vase, slightly taller than the greenery. Insert them at different angles—some straight up, some slightly tilted—to create a natural, not-too-perfect look. You want the focal flowers to be the center of attention, so make sure they’re not hidden by the greenery or filler flowers.
Pro Tip: If you’re using a vase without floral foam, you can crisscross the stems of the focal flowers to help them stay in place. This creates a “grid” that holds the stems upright.
4. Add Filler Flowers
Now, add your filler flowers to fill in the gaps between the focal flowers and greenery. Insert them at different heights—some shorter, some taller—to add volume and texture. You want the filler flowers to complement the focal flowers, not overpower them. If you have any small gaps, use filler flowers to fill them in—this makes the bouquet look full and lush.
5. Adjust and Perfect
Step back and look at your bouquet. Are the flowers evenly distributed? Is there any gap that needs filling? Are the heights balanced? Adjust the stems as needed—you can trim them shorter if they’re too tall, or reposition them to fill in gaps. Don’t be afraid to move flowers around until you’re happy with the look. Remember: perfection isn’t the goal—you want a natural, effortless look.
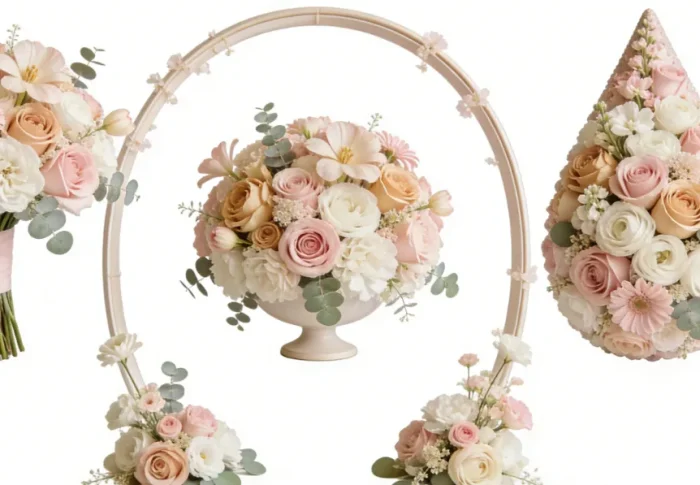
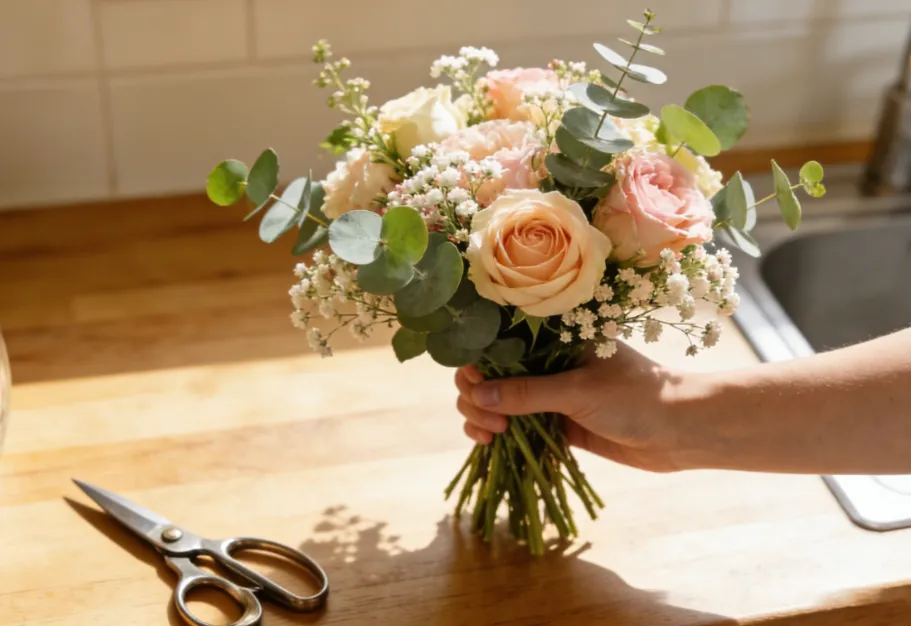
Method 2: Hand-Tied Bouquet (Professional and Portable)
A hand-tied bouquet is a more professional method—great for gifts, bridal bouquets, or if you want to display the bouquet without a vase. It’s a bit trickier than the vase arrangement, but with a little practice, you’ll get the hang of it. Here’s how to do it:
1. Gather Your Stems
Lay out all your prepped flowers and greenery on a clean surface. Sort them by type: focal flowers, filler flowers, and greenery. This will make it easier to grab the stems as you arrange.
2. Start with Greenery
Hold a few greenery stems in your non-dominant hand (this is your “base” hand). Hold them at a 45-degree angle, with the stems crossing each other slightly. This creates a stable base for the bouquet.
3. Add Focal Flowers
Take one focal flower and place it on top of the greenery, slightly to the left. Hold it firmly with your base hand. Then, take another focal flower and place it slightly to the right, a little lower than the first. Continue adding focal flowers, alternating sides, and rotating the bouquet slightly each time. This creates a rounded, balanced shape.
Pro Tip: Keep the stems crossed as you add each flower—this helps hold the bouquet together. And don’t worry if the stems are a little messy—this adds to the natural look.
4. Add Filler Flowers
Once you have all your focal flowers in place, add the filler flowers. Insert them between the focal flowers, filling in any gaps. Hold them at a slightly lower angle than the focal flowers, so they don’t overpower them. Rotate the bouquet as you add filler flowers to ensure even distribution.
5. Add More Greenery (Optional)
If you want to add more texture, add a few more greenery stems around the edges of the bouquet. This frames the flowers and adds a natural, organic look.
6. Secure the Bouquet
Once you’re happy with the arrangement, hold the stems tightly with your base hand. Take floral tape and wrap it around the stems, starting about 1 inch below the blooms. Wrap the tape tightly, moving down the stems, until you reach the bottom (about 3-4 inches below the blooms). Cut the tape and secure it with a knot or a small piece of tape.
Pro Tip: If you don’t have floral tape, you can use twine or ribbon. Wrap it around the stems tightly, then tie a bow to secure it.
7. Trim the Stems
Use sharp scissors to trim the bottom of the stems at a 45-degree angle, so they’re all the same length. This makes the bouquet look neat and allows it to stand upright in a vase (if you choose to use one).
8. Add a Finishing Touch
Wrap the stems in ribbon or twine to hide the floral tape. Start at the top (just below the blooms) and wrap the ribbon down the stems, then tie a bow at the bottom. You can also add a small tag or a sprig of greenery to the bow for an extra touch.
Step 4: Keep Your Bouquet Fresh (For Days!)
Now that you’ve created your beautiful bouquet, you want it to last as long as possible. Here are my top tips for keeping your flowers fresh:
- Change the Water Daily: Bacteria grows in water, which causes flowers to wilt faster. Change the water every day, and rinse the vase thoroughly to remove any bacteria.
- Trim the Stems Every 2-3 Days: Trim ¼ inch off the bottom of the stems every 2-3 days (under water, at a 45-degree angle). This helps the flowers absorb water better.
- Keep Them Away from Heat and Fruit: Heat sources (like radiators, stoves, or direct sunlight) and fruit (which releases ethylene gas) cause flowers to wilt faster. Keep your bouquet in a cool, dark place (away from fruit) to extend its lifespan.
- Remove Wilted Flowers: If any flowers start to wilt, remove them immediately. This prevents the bacteria from spreading to the other flowers.
- Use Flower Food: Flower food provides nutrients that keep flowers fresh longer. If you run out, use the homemade mixture (1 teaspoon sugar, 1 teaspoon bleach, 2 cups water).
With these tips, your bouquet should stay fresh for 5-7 days—sometimes even longer! I’ve had peony bouquets last up to 10 days with proper care.
Troubleshooting: Common DIY Bouquet Mistakes (And How to Fix Them)
Even the best DIYers make mistakes—and that’s okay! Here are some common mistakes I’ve made (and learned from) when making bouquets, and how to fix them:
Mistake 1: The Bouquet Looks Lopsided or Unbalanced
Fix: Rotate the bouquet as you add flowers. Make sure you’re adding flowers to both sides, and vary the heights. If one side is heavier, add a few more stems (filler or greenery) to the lighter side to balance it out.
Mistake 2: The Flowers Are Too Crowded
Fix: Less is more! If your bouquet looks overcrowded, remove a few stems (start with filler flowers or greenery). You want the flowers to have room to breathe—overcrowding causes them to wilt faster and makes the bouquet look messy.
Mistake 3: The Stems Won’t Stay in Place (Vase Arrangement)
Fix: Crisscross the stems of the focal flowers to create a grid. You can also use floral foam to hold the stems in place. If you don’t have floral foam, add a few pebbles or marbles to the bottom of the vase—this helps weigh down the stems.
Mistake 4: The Bouquet Wilts Too Fast
Fix: Make sure you trimmed the stems at a 45-degree angle under water. Change the water daily, and keep the bouquet away from heat and fruit. If the flowers are still wilting, try adding flower food or the homemade mixture.
Mistake 5: The Color Palette Clashes
Fix: Stick to 2-3 main colors. If the colors clash, remove the flowers that are causing the issue and replace them with a neutral color (like white or green). Remember: neutral colors go with everything!
Final Thoughts: Embrace the Imperfection
The most important thing to remember when making a DIY flower bouquet is to embrace the imperfection. Professional florists spend years perfecting their craft, but your DIY bouquet doesn’t need to be “perfect”—it just needs to be yours. A few uneven stems, a slightly lopsided shape, or a mix of colors that’s a little “unconventional” is what makes your bouquet unique and special.
I hope this guide has inspired you to grab some flowers and start creating. Whether you’re a complete beginner or a seasoned DIYer, making your own bouquet is a fun, rewarding experience that adds beauty to your home and joy to your life. And remember: practice makes perfect. The more bouquets you make, the more confident you’ll become, and soon you’ll be creating professional-quality arrangements without even thinking about it.
Now, go grab some flowers and get creative! I’d love to see your DIY bouquets—tag me on Instagram (@[YourUsername]) so I can admire your handiwork. Happy arranging, flower friends!
FAQs (Frequently Asked Questions)
Q: Can I use grocery store flowers for a professional-looking bouquet?
A: Absolutely! Grocery store flowers are fresh, affordable, and perfect for DIY bouquets. Look for flowers with firm stems and tight buds—they’ll last longer and open up beautifully. Some of my favorite grocery store flowers are roses, tulips, hydrangeas, and baby’s breath.
Q: How much does it cost to make a DIY flower bouquet?
A: It depends on the flowers you choose, but you can make a medium-sized bouquet for $20-$30. Focal flowers (like peonies) are a bit more expensive, but filler flowers and greenery are affordable. Grocery stores often have sales on flowers, so keep an eye out for deals!
Q: How long will a DIY flower bouquet last?
A: With proper care (changing the water daily, trimming stems, keeping them away from heat and fruit), a DIY bouquet will last 5-7 days. Some flowers (like roses and chrysanthemums) last longer than others (like peonies and tulips), but all will last longer with proper care.
Q: Can I make a bouquet without floral tape?
A: Yes! You can use twine, ribbon, or even string to secure a hand-tied bouquet. For a vase arrangement, you don’t need floral tape at all—just crisscross the stems to hold them in place.
Q: What’s the best time to buy flowers for a DIY bouquet?
A: The best time to buy flowers is in the morning, when they’re the freshest. Avoid buying flowers that have been sitting in the store for days (look for tight buds and firm stems). If you’re buying flowers for a special occasion, buy them 1-2 days in advance to give them time to hydrate and open up.